



Pick one capture tool today, whether that’s an app, a spreadsheet, or a plain notebook, and commit to a 15 minute weekly review every Sunday. That’s the entire system. Expect spending a small amount of time daily for logging, a few minutes a week for review, and some additional time once a month to close the books. After 30 days, you’ll have clean categories and at least one clear place to cut back.
TL;DR:
- Using a simple capture, categorize, review system, you only need about 15 minutes weekly to stay on top of expenses and identify patterns.
- Manual entry consistently fosters better behavior change than automatic bank sync apps, despite requiring more effort.
- Keeping 8 to 12 broad categories, such as housing, groceries, and entertainment, balances detail with system manageability over several months.
- Regular weekly and monthly reviews, focusing on one adjustment at a time, are crucial for catching overspending and improving habits.
- Duplicates and missing entries can be minimized by choosing one source of truth for each expense type and cross-checking bank statements regularly.
Table of Contents
- How to Track Expenses With a Three-Step Loop
- Should You Use an App, a Spreadsheet, or Manual Entry?
- What Categories Should You Use to Track Personal Expenses?
- How Do You Make Daily Expense Logging Actually Happen?
- What Does a Weekly and Monthly Expense Review Look Like?
- How Do You Track Cash Spending, Annual Bills, and Subscriptions?
- Your 30-Day Expense-Tracking Quick Start
- How Do You Spot Spending Patterns in Your Expense Data?
- How Do You Avoid Duplicate or Missing Expense Entries?
- Is It Safe to Use an App to Track Your Expenses?
- Why a Minimal Tracking System Beats a Complicated One
- Get a Free Expense-Tracking Template
- Sources
- FAQ
How to Track Expenses With a Three-Step Loop
Every reliable expense-tracking method boils down to three moves: capture, categorize, review. Skip one and the whole thing falls apart. Capture means logging the purchase the moment it happens or during a fixed slot each day. Categorizing means sorting it into one of your preset buckets, not a vague “other” pile. Review means actually looking at the data on a schedule and changing something because of it.
The Vault system recommends keeping each entry under 10 seconds and aiming for 90% capture rather than chasing perfection. Missing one gas station receipt won’t wreck your budget. Missing them for three weeks straight will. A NerdWallet analysis backs this up: reconciling on a fixed schedule, weekly or monthly, is what catches errors before they snowball.
- Capture the purchase within minutes, using whatever tool is already in your pocket.
- Categorize it immediately, so nothing lands in a junk-drawer bucket you’ll never sort later.
- Review weekly, and pick exactly one adjustment. Maybe you cut restaurant delivery for a week or move grocery shopping to a cheaper store.
Pro Tip: Do your weekly review at the same time and place every week, like Sunday morning with coffee. Tying it to an existing routine is what makes it stick past week two.
Should You Use an App, a Spreadsheet, or Manual Entry?
Every method trades off effort against insight. Bank-sync apps auto-import transactions, which is convenient, but they routinely miss cash purchases and mangle categories. Wealthvieu’s comparison found manual entry drives more behavior change precisely because you’re forced to notice the purchase, while automatic sync removes that moment of friction entirely.
Spreadsheets sit in the middle. Microsoft’s Excel guide walks through a five-column setup (date, merchant, amount, category, notes) with a pivot table or SUMIFS formula that totals each category automatically. That gives you full control, at the cost of more manual setup.
A hybrid works best for most people: manual capture for daily spending, plus a monthly bank statement cross-check to catch what you missed. Quick decision checklist:
- Want the least effort and don’t care about missed cash spending? Use an app with bank sync.
- Want to actually change your habits? Log manually, even if it’s just a notes app.
- Want full customization and don’t mind formulas? Build a spreadsheet.
What Categories Should You Use to Track Personal Expenses?
Start with 8 to 12 broad categories. More than that and you’ll abandon the system by week three; fewer and you lose useful detail. A workable starter list:
- Housing (rent, mortgage, utilities)
- Groceries
- Transportation (gas, transit, car payment)
- Dining out
- Subscriptions (streaming, apps, memberships)
- Health (insurance, prescriptions, copays)
- Debt payments
- Savings and sinking funds
- Personal care
- Entertainment
- Miscellaneous (kept small, on purpose)
SpendTrak’s guide recommends waiting at least 60 days before splitting any category into subcategories. You need real data first. Cap “miscellaneous” at a small percentage of total spending. If it keeps growing, that’s a signal you’re missing a category, not that miscellaneous needs its own budget line. Treat savings contributions and debt payoff as expense categories too, not leftovers. Money moved toward a goal is money you spent on that goal.
How Do You Make Daily Expense Logging Actually Happen?
Friction kills tracking habits faster than anything else. Put your capture tool one tap away, whether that’s a home-screen app icon or a pinned notes file, and attach logging to something you already do daily. After your morning coffee. After dinner. Right when you sit down at your desk.
For cash purchases, snap a photo of the receipt the moment you get it, or use a single-entry rule: log one lump “cash withdrawal” transaction and categorize it later once you know where it went. Lost the receipt? Don’t stall on it. Estimate the amount at the end of the day or week and move forward.

Pro Tip: Set a standing fallback rule now: any purchase you can’t remember by Sunday gets estimated and logged as “estimated,” never skipped entirely. A rough number beats a blank space every time.
What Does a Weekly and Monthly Expense Review Look Like?
The weekly check should take a modest amount of time. Here’s the exact sequence:
- Total every category for the week.
- Flag any category that ran over its target.
- Pick exactly one tweak to try next week, not five.
Monthly close takes some time and goes deeper:
- Export or total the month’s numbers by category.
- Compare each category against your target or budget.
- Identify your two biggest overages.
- Set one concrete adjustment for each going into next month.
- Fold in any irregular expenses (car repair, annual fee) that hit this month, so they don’t get lost in a single category’s noise.
NerdWallet’s research points to this rhythm as the difference between data you collect and data you actually use. A weekly review that produces zero decisions is just bookkeeping. If you want a target to measure against, pairing this review with a step-by-step budget gives every category a number to compare, not just a total.
How Do You Track Cash Spending, Annual Bills, and Subscriptions?
Cash and irregular expenses are where most tracking systems quietly fall apart. Fix them with a few standing rules instead of hoping you’ll remember.
- Cash: photograph every receipt on the spot, or use the envelope method and log the withdrawal as a single lump entry.
- Annual and irregular bills: divide the yearly cost by 12 and set aside that amount monthly in a sinking fund, or simply flag the expense as “irregular” the month it hits so it doesn’t distort your regular categories.
- Subscriptions: run a quarterly audit. List every recurring charge, check the last time you actually used each one, and cancel what’s dead weight.
Moneysmart recommends this exact combination: reviewing past statements to catch forgotten subscriptions, and setting reminders for irregular annual costs so they never surprise you. A five-minute quarterly subscription check has a way of paying for itself immediately.
Your 30-Day Expense-Tracking Quick Start
Day one, pick your tool, set up 8 to 12 categories, and connect your bank accounts if you’re using an app. Everything after that is just showing up on schedule.
| Day | Checkpoint | What success looks like |
|---|---|---|
| Day 1 | Choose tool, set categories | Tool installed, categories named |
| — | First weekly review | Every purchase logged and categorized |
| — | Second weekly review | One habit tweak already tested |
| — | Third weekly review | Categories feel accurate, not guessed |
| Day 30 | Monthly close | One persistent overspend identified |
By day 30, you should have completed four weekly reviews, populated categories with real numbers, and named one spending pattern you’re ready to fix. That’s the whole goal. For a deeper first-week walkthrough, Finblog’s quick-start guide covers the daily capture habit in more detail.
How Do You Spot Spending Patterns in Your Expense Data?
Raw totals tell you what you spent. Patterns tell you why. Once you’ve got two or three weeks of entries, start looking at your data sideways instead of just adding it up.
Compare week to week, not just category to category. But if dining out creeps up every single week for a month, that’s a pattern worth naming.
Look at day-of-week clustering. Once you see that, you can decide if it’s worth it or if it’s just habit spending you never noticed.
Watch for category bleed. If “entertainment” keeps ballooning while “dining out” stays suspiciously flat, you might be miscategorizing the same behavior under two different labels. That’s a sign to merge categories, not add more.
Set a target next to the actual number for each category. A number without a target is just trivia. A number next to a target tells you instantly whether you’re on track. Pairing your tracked data with budgeting techniques built around your actual patterns, rather than a generic percentage rule, tends to stick longer because it reflects how you actually spend.
Finally, give any pattern at least three weeks before acting on it. One expensive week is noise. Three expensive weeks in a row is a real pattern.
How Do You Avoid Duplicate or Missing Expense Entries?
Duplicates and gaps are the two most common ways expense tracking quietly goes wrong, and both are fixable with small habits rather than more effort.
Duplicates usually come from running an app with bank auto-import alongside manual entry. A purchase gets logged twice, once by you and once by the sync. Fix this by picking a single source of truth for each spending type: manual for cash and quick purchases, auto-import for recurring bills you never touch by hand.
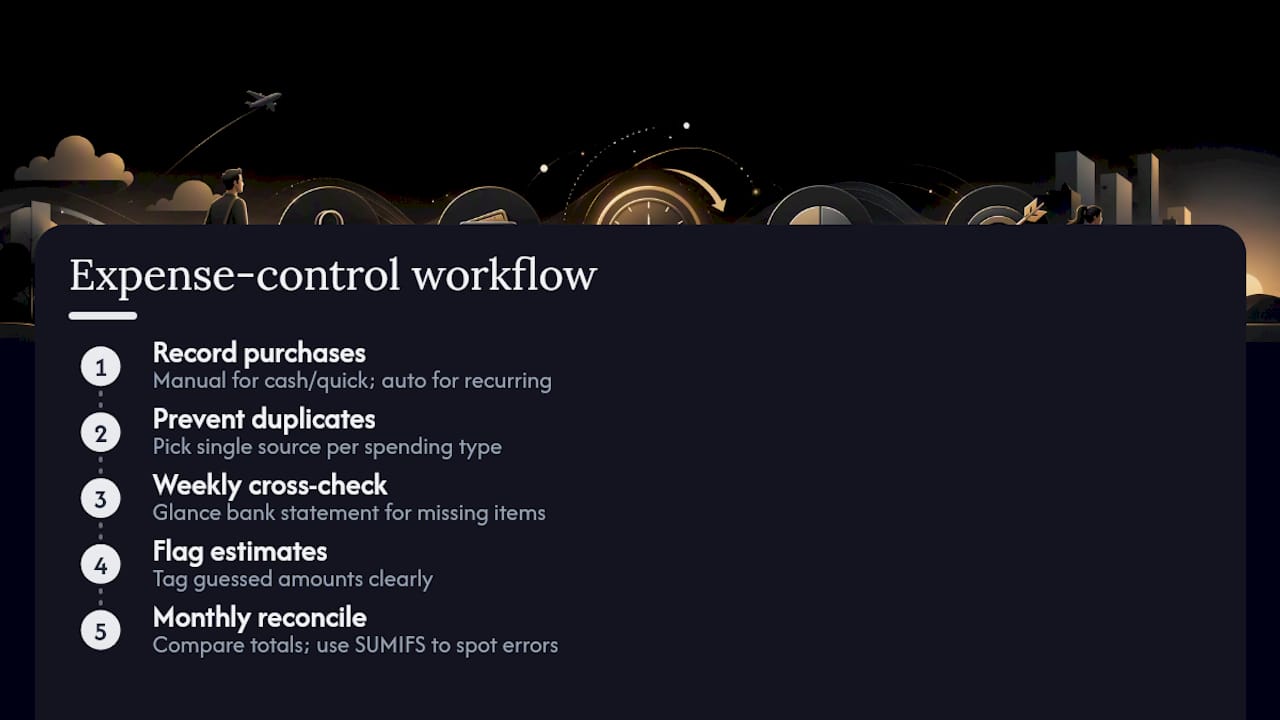
Missing entries usually trace back to a specific moment: you were in a hurry, the wifi was down, or the purchase felt too small to bother logging. Build in a catch-all habit instead of chasing perfection. At your weekly review, glance at your bank statement for anything that doesn’t appear in your tracker. That five-minute cross-check catches most gaps before they compound.
Reconcile totals monthly against your actual bank and card statements. If your tracked total is off from your statement by more than a small margin, something got double-counted or skipped, and it’s worth tracing back rather than shrugging it off. This is also where a spreadsheet’s SUMIFS formula earns its keep. It flags category totals instantly, so a duplicate entry that inflates one category is easier to spot than if you’re eyeballing a long list of rows.
Label estimated entries clearly. A purchase you guessed at should never look identical to one pulled straight from a receipt. Tag it, and adjust it later if you find the real number.
Is It Safe to Use an App to Track Your Expenses?
Bank-linked apps typically use read-only connections through a third-party aggregator, meaning the app can see your transactions but can’t move money. Still, that read access to your full spending history is sensitive data, and it’s worth treating it that way.
Before linking any account, check whether the app uses two-factor authentication and whether it encrypts data both in transit and at rest. If that information isn’t easy to find on the app’s website, that’s itself a warning sign.
Review the app’s data-sharing policy specifically, not just skim it. Some free tracking apps monetize by selling aggregated spending data or targeting ads based on your purchase categories. That may be an acceptable trade for some readers and not for others, but you should know which one you’re agreeing to.
If you’d rather avoid linking bank credentials entirely, manual entry into a notes app or spreadsheet sidesteps the issue completely. You lose the auto-import convenience, but nothing about your spending ever leaves your own device. For anyone handling sensitive financial decisions alongside tracking, that lower-exposure approach is worth weighing against the time saved by automatic sync.
Why a Minimal Tracking System Beats a Complicated One
Most people quit expense tracking not because it’s hard, but because they build a system with 40 categories and three apps talking to each other, and it collapses under its own weight within a week. The minimal loop works because it survives a bad week. You can log for two minutes even when you’re exhausted.
Weekly reviews beat monthly-only checks because behavior change needs a shorter feedback loop. Wait a month to notice you’re overspending on takeout, and you’ve already absorbed four weeks of the habit. Catch it after week one, and you adjust before it becomes routine.
None of this is rigid. Some readers will do better with a Friday review instead of Sunday, or a monthly-only rhythm if weekly feels excessive. Adapt the timing. Keep the loop.
— Povilas
Get a Free Expense-Tracking Template
You don’t need to build your category list or spreadsheet formulas from scratch. A downloadable monthly budgeting template is available, built around the same capture-categorize-review loop covered here, so your first weekly review already has a structure to plug into. It’s a genuine time saver over starting with a blank spreadsheet and guessing at column headers.
This is entirely optional. The three-step loop works with a notebook and a pen just as well as it works with a template. But if you’d rather skip the setup work, sign up on the site to get the template along with a weekly review checklist sent to your inbox, and start your 30-day tracking window with day one already done.
This article is general information, not a substitute for advice from a qualified financial advisor. Consult a qualified financial professional about your own circumstances before acting on anything here.
Sources
- How to Track Your Monthly Expenses: 8 Tips to Try – NerdWallet
- Moneysmart
- How to Track Expenses: A Simple System That Sticks — Vault
- How to Track Expenses in 2026 — Methods, Apps, and a Monthly Review System | Wealthvieu
FAQ
What Is the Best Way to Keep Track of Expenses?
Pick one low-friction capture tool, log purchases within minutes of spending, sort them into 8 to 12 broad categories, and review the totals for 15 minutes every week.
What Is the 50/30/20 Spending Rule?
It’s a budgeting framework that splits after-tax income into roughly 50% needs, 30% wants, and 20% savings or debt payoff. Tracking your actual expenses first is what tells you whether your real spending matches that split, covered in more depth in Finblog’s guide to budgeting techniques.
How Do I Budget $4,000 a Month?
Start by tracking a full month of expenses in your chosen categories, then set target amounts for each category based on what you actually spend versus what you want to spend, adjusting the biggest overages first. Finblog’s step-by-step budget guide walks through setting those targets once your tracked data is in place.
How Do I Record My Monthly Expenses?
Log each purchase into your chosen tool as it happens or during a fixed daily slot, categorize it immediately, then total every category at month’s end and compare that total against your target.
How Long Does It Take to Track Expenses Each Day?
Daily logging takes a small amount of time if you capture purchases as they happen, plus a 15 minute review once a week and some additional time once a month to close the books.